|
How to Install Control Panel onto your Vehicle
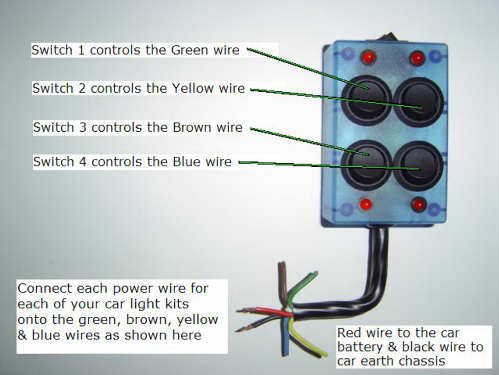
How to Install Control PanelPlease bare in mind that the LED Distribution Control Panel, is rated AT A TOTAL of 5 Amps maximum. This includes all the switches on the panel and the main on/off switch. Having said that, should you install more car lighting accessories to the control panel that draw more then the TOTAL current rating of 5 amps, then your going to need to know how to install a relay onto the control panel to maximise it's use. The control panel will work fine as is with any Neon or LED lighting kits on the market for automotive applications. The panel has been successfully tested with 8 lighting kits connected to it which included one neon undercar kit, one led undercar kit, two strobe lights, one black light, and 3x 10" interior neon tubes totaling approximately 3.5 amps. Just be sure that whatever you install on the panel that the kits draw NO MORE current then 5 amps in total. You can check the current rating of your light accessories by looking for amperage ratings on the kits or by contacting the dealer you purchased them from. Ok, moving on... Presuming your installing a number light kits onto the panel that DO NOT draw more then 5 amps in TOTAL, run a thick gauge power wire for the control panel directly to the positive post of the battery, putting an in-line fuse holder at the end of the wire and no more then 18 inches away from the battery connection. This power wire will connect onto the RED wire coming from the control panel. You will then need to connect all of the positive power leads of the lighting accessories to each of the colored wires coming from the panel, as shown below. Connect all of the ground leads for the individual light accessories, to a common chassis ground. Also connect the black wire from control panel to common chassis ground.
The LED Distribution Control Panel cord is designed in such a way that you make all the connections at the end of the 60cm cord, so that the connections will be hidden up under the dash. The cord is long enough so that you will be able to place the control panel on your "center-console" when not in use, or you can even use the control panel cord to mount the panel onto the dash as seen in the how to install control panel pictures here for example. You are also free to mount it in any way you see fit.
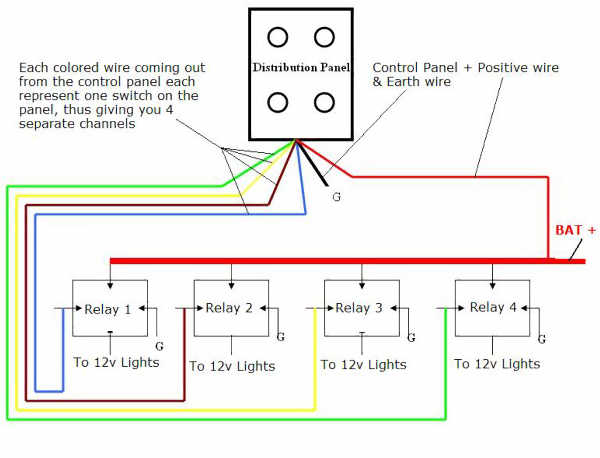
The control panel will work fine with any Neon or LED lighting kits on the market for automotive applications, provided you install NO MORE then 4 separate lighting kits, and that the kits draw NO MORE current then 5 amps. You can check the current rating of your light accessories by looking for amperage ratings on the kits or by contacting the dealer you purchased them from. In order to be able to run MORE accessories from the control panel that "may" draw more then the current rating of 5 amps, you will first need to know the current rating of each individual accessory. If these accessories, in TOTAL, uses a current rating higher than that of the switch panel, then you must use a relay to provide the current needed. However, all Neon and LED kits on the market today for automotive applications will work fine with the LED Distribution Control Panel as it is now, and without the need for relays as stated above in the second paragraph. But strobe lights for example tend to have a higher current rating then that of neons or LED, (led's being the lesser of the three) so you will need to know the current rating for strobe lights in this case to determine if you need to use a relay or not. If the TOTAL current draw for ALL the lighting accessories is LESS than the maximum current rating of the control panel, then you will NOT need to install a relay. Simply run a power wire directly to the positive terminal of the battery going to the control panel. We advise putting an in-line fuse holder at the end of the wire closest to the vehicles battery, no more then 18 inches away, and use the 5 amp fuse supplied in the kit to protect the control panel and wires. If the current draw for your accessories TOTALS MORE than the current rating of the control panel, then you will need to add a relay. Most automotive relays are labeled with their amperage rating in DC Amps. Having said that, lets suppose your running 8 light accessories off the control panel, 2 accessories from each switch on the panel, and they are all drawing more Amps then the TOTAL current rating of 5 amps, then what you'll need to do in this case is wire the panel to the relays according to the diagram below.
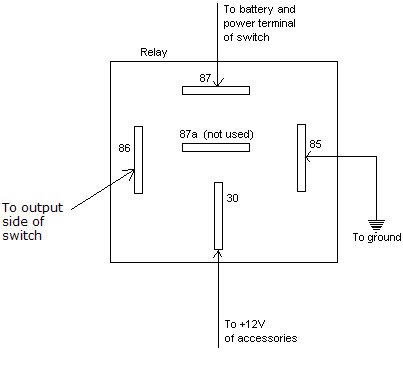
This is what each Relay looks like close up...
Run a "thick gauge" power wire for the relays directly to the positive post of the battery, putting an in-line fuse holder at the end of the wire closest to the battery connection. As a side note, you can hook up MORE then 2 items per channel to the control panel if you wish, just be sure to get the correct relay to handle the TOTAL current draw (Amps) of each light kit. You then need to connect all of the positive power leads of the lighting accessories to the power terminals of each relay, as shown above and connect all of the ground leads for the individual light accessories to a common chassis ground. Lets say you just want to hook up ONE relay to ONE of the switches on the control panel, then simply follow the "how to install control panel" diagram above and wire it in the same way as described, but only for one relay. Good luck and Enjoy!
Back to Main LED Distribution Control Panel Page

|